MCP Serverside Code Basics
Wrap your head around the core feature of Marketing Cloud Personalization (Interaction Studio) and build the bridge between marketer and customer.
MCP Serverside Code Purpose
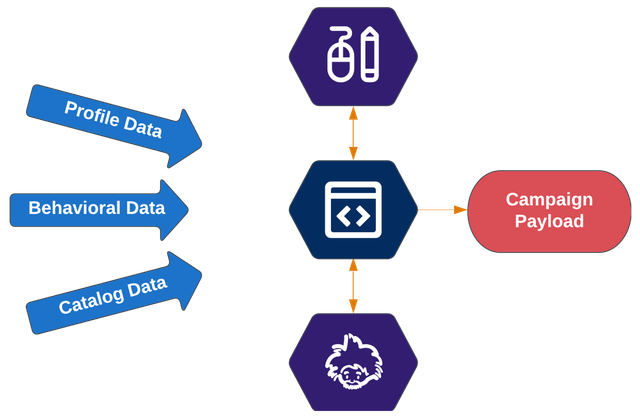
Whether you are creating a Web, Serverside or Triggered Campaign Template in the Marketing Cloud Personalization (Interaction Studio), you start with the Serverside Code tab. It is the true heart of the MCP platform responsible for delivering data-driven personalisations.
The developer can use the Serverside Code to:
- leverage user profile and behavioural data
- lookup company catalog data
- build campaign configuration and use provided data
- select and pull Einstein Recipe recommendations
to output a transformed payload containing everything needed for a unique experience for each customer.
MCP Serverside Code Basics
All the above things are done within the Serverside Code tab of the MC Personalization Template creation UI with TypeScript programming language and built-in functions. Don't worry if you don't know TypeScript - basic knowledge of modern JavaScript is enough to create good templates.
Open Time Email Campaigns are using different, older system. I covered its details in a separate guide.
When you open the Serverside Code tab in a new Template creation screen for Web, Serverside or Triggered Campaign within the Marketing Cloud Personalization, you will be greeted by a bit intimidating interface. Let's start by breaking it down section by section:
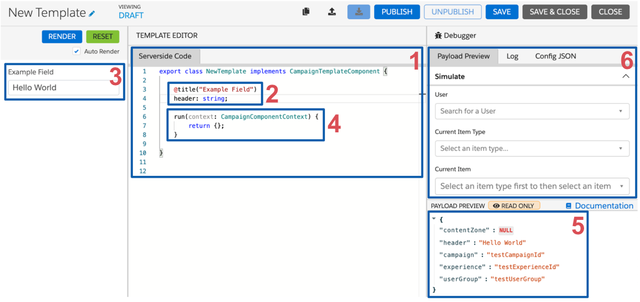
- The middle pane contains your TypeScript code responsible for all the magic happening on the server side.
- Within the middle section (1), you will see two sections. The first one is responsible for defining the Campaign configuration form. In the screenshot above, a
headerfield is defined as astringand decorated with a custom title. - The form definitions you develop (2) will be available for a preview on the left pane. This section lets you see what the Campaign Configuration screen will look like and enables you to fill it in to see the interactions.
- Returning to the middle section (1), below the configuration form definitions (2), you will find the
runfunction withcontextbeing passed as an argument. This is where you can optionally transform or enrich the data captured from the configuration form. Thecontextprovided to the function contains triggering event data and access to many helper functions to bring your template to the next level. You can also add properties (for example, debugging details) to the returned object to make them available in the payload (5). - The bottom part of the right pane displays the Payload Preview. It is updated in real-time as you write your TypeScript (1) or change the configuration (3). it is an excellent way to validate whether you are getting the desired outcome.
- If your template leverages user or catalog data (for example, user attributes for personalisation or anchored recipes) to see the proper payload, you must provide example data. The top section of the right pane lets you do it. You can add the IDs and see the payload (5) adapt to the simulated scenario.
The final outcome of your work in this tab is the personalised payload (5). Depending on the type of campaign this template is for, it will either be delivered as is (Serverside), put into a Data Extension (Triggered Campaign) or be available to leverage for logic in Clientside Code and experience in Handlebars tabs (Web Campaign).
If you don't see experience or campaign in the payload object (5), it means there is a bug in your template code (1).
If you don't see the configuration form preview (3) updates despite making changes in the serverside code (1), MCP probably froze. Check whether you are still logged in to the MC Personalization (MCP session length is shorter than SFMC's). If yes, cut (ctrl/cmd + x) your whole serverside code, provide any symbol (like a) to overwrite the cache and replace it back by pasting the code (ctrl/cmd + v).
Writing Serverside Code
As mentioned above, when you create a new Web, Serverside or Triggered Campaign Template and view the Serverside Code tab, you will get a concise and simple code snippet:
export class NewTemplate implements CampaignTemplateComponent {

    @title("Example Field")
    header: string;

    run(context: CampaignComponentContext) {
        return {};
    }

}
There is a collection of much more complex Global Templates available that are great starting points for building actual campaigns, but here we will start with the base snippet and build up from it for learning purposes.
There are three critical parts of that snippet:
export class NewTemplate implements CampaignTemplateComponent {

    // 1: field configuraiton
    @title("Example Field")
    header: string;

    run(context: CampaignComponentContext) {
        // 2: run block

        return {}; // 3: return statement
    }
}
1. Field Configuration
The field configuration lets you add properties that will become part of the campaign configuration form used by marketers to set the experiences. It is the primary data input; MCP will directly pass all properties you add here to the campaign response.
Learn more2. Run Block
Run block has access to the context object containing trigger event details and MC Personalization data. It can also pull information configured in the properties by the marketer. With all of this, you can use it to enrich and transform the data that the campaign will return.
3. Return Statement
Return statement within the run block lets you add custom properties to the final campaign payload. Whatever you add to the returned object will be available along with the properties from the field configuration section.
The run block execution works differently during the template creation and campaign configuration. When the marketer configures the campaign, MCP applies the changes executed within the run in real time - this may lead to content changes or even the removal of field input. You shouldn't transform the data in the fields directly but rather do it on new variables:
export class PersonalizedOverlay implements CampaignTemplateComponent {

    @title("Personalized Header")
    @subtitle("Use {firstName} to insert first name personalization")
    initialHeader: string;

    run(context: CampaignComponentContext) {
        let header = this.initialHeader.replace(/{firstName}/g, context.user.attributes?.firstName || 'Trailblazer');

        return { header };
    }
}
This way, the configured field will stay as it is, but in the final campaign payload, you will also have the transformed variable for use.
Keep this in mind when you have to provide a payload according to a specification (e.g. in the Serverside Campaign Template). If you want to make any transformations to a manual input, add some prefix to the property in the field configuration section (e.g. initial) and output the expected name only through the return statement of the run block, as shown in the snippet above.
With the basics of Serverside Code processing, you are ready to start coding. Next step - build MCP Campaign Template inputs with Serverside Code Properties.
All MCP Serverside Code Guides
📄️ Serverside Code Basics
Wrap your head around the core feature of Marketing Cloud Personalization (Interaction Studio) and build the bridge between marketer and customer.
📄️ Serverside Code Properties
Build your marketers' dream campaign configuration UI in Marketing Cloud Personalization (Interaction Studio). All the input magic in one place.
📄️ Serverside Code Context
Context is king. Also when writing MCP Template Serverside Code.
Learn more
Here, I want to share a few of my favourite sources focusing on MCP Serverside Code and its use in Campaign Templates:
- My MCP Campaign Templates and code snippets
- My GitHub repository with Global and Custom Templates
- Christoper's Long GitHub repository with Complex Templates
- Salesforce Japan Template Catalog with Web Campaigns
Found other inspiring MCP Serverside Code examples? Let me know!